Installation and use
Installation
The housing is intended to be installed inside or outside a building but to the shelter of a vertical splash water and direct sunlight.
The product is delivered disassembled. This enables the connection to the screw terminals.
Before connecting your cable strands to the product’s screw terminals, you must insert the cable gland's nut and the seal.
Connect wires on Inputs and Outputs that will be used.
For connectors, it is preferable to use several single wires with a gauge of 20-26 AWG. As the connectors pluck the wires plugged inside at about 4mm of the wire-end , strip the wires on about 5 to 6 mm of their extremity before plugging them into the connectors.
Once the assembly is done, the casing can be closed.
For more information about the casing, visit: www.spelsberg.com
Assemby procedure
Propagation radio
In order for the sensor to funtion correctly, it is better to limit the number of obstacles in order to avoid excessive attenuation of the radio wave. Also, the antenna needs to be directed upwards.
Autonomy
| Transmission periodicity | Battery life | Battery life (with 3 Input contacts closed) | Battery life (with 6 Input contacts closed) | Battery life (with 1 Output closed) |
|---|---|---|---|---|
| 1 frame/2 hours | +15 years | 12 years | 9 years | +1.5 years |
| 1 frame/24 hours | +15 years | +15 years | +15 years | +2 years |
The information in the table above is based on the default configuration, and when the spreading factor used is SF12.
Human Machine Interface
There are three leds on the IN’O devices:
ASS: blinking until the association to a network is done.
 FNC: blinking each minute while an input is activated.
CNF: blinking in the configuration mode.
- A button user is available to enter in configuration mode.
| Way to trigger it | One press on the USER button or specific ZCL command |
| Way to stop it | Another press on the USER button or specific ZCL command |
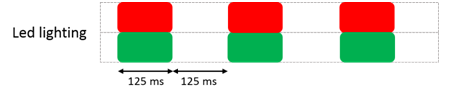
| Effects on the sensor | The CONF led (red) blinks (3 sec. OFF, 3 sec. ON) and the sensor sends an uplink frame every minute. The blinking is illustrated below this table. |
| Duration | The configuration mode lasts 10 minutes when it is triggered by pressing the USER button |

- It is possible to ask a ReAssociation procedure if no down frame is received by the sensor during a given periodicity (4 days by default) or if a given number (100 by default) or failure (no acquittement is received) are reached by sending an applicative frame to the sensor or by the IHM of the sensor.
The sensor keeps the AppEUi and DevAddr configured, Confirmed/Unconfirmed configuration and all applicative configurations. On the other hand, LoRaWAN configuration (channel, datarate …) are lost.
| Way to trigger it | Three short presses on the USER button or ZCL command from LoRaWAN cluster. |
| Effects on the sensor | The ASSO LED (green) blinks as the “no commissioned sensor” LED is lit. |
- A factory reset is available on Watteco’s sensors. It deletes all the applicative settings saved in the flash memory (i.e.: the configured batches and reports will be deleted). A reset does not delete the communication channels added by a MAC command.
The sensor keeps the AppEUi and DevAddr configured. On the other hand, LoRaWAN configurations (channel, datarate …) and applicative configurations are lost.
| Way to trigger it | Two short presses and one long press for approximately 7 seconds on the USER button. |
| Effects on the sensor | The CONF LED (red) and ASSO LED (green) blink at the same time briefly. All the applicative settings (for batches and reports) are deleted. The blinking is illustrated below this table. |